Having your own server is good because you can control everything and you don’t have any restriction. so let’s get started.
CREATING A DROPLET ON DIGITAL OCEAN
To create a server on the cloud, just follow this link in order to have $100
free credit: https://m.do.co/c/3fde937c70feafter signing up and logining into the panel. Go to Create Option and choose
Droplets options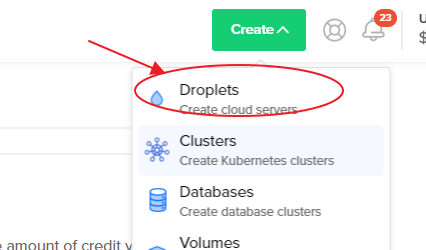 then choose ubuntu 20 as distribution and your plan, in this case I chose
$10 per month plan
then choose ubuntu 20 as distribution and your plan, in this case I chose
$10 per month plan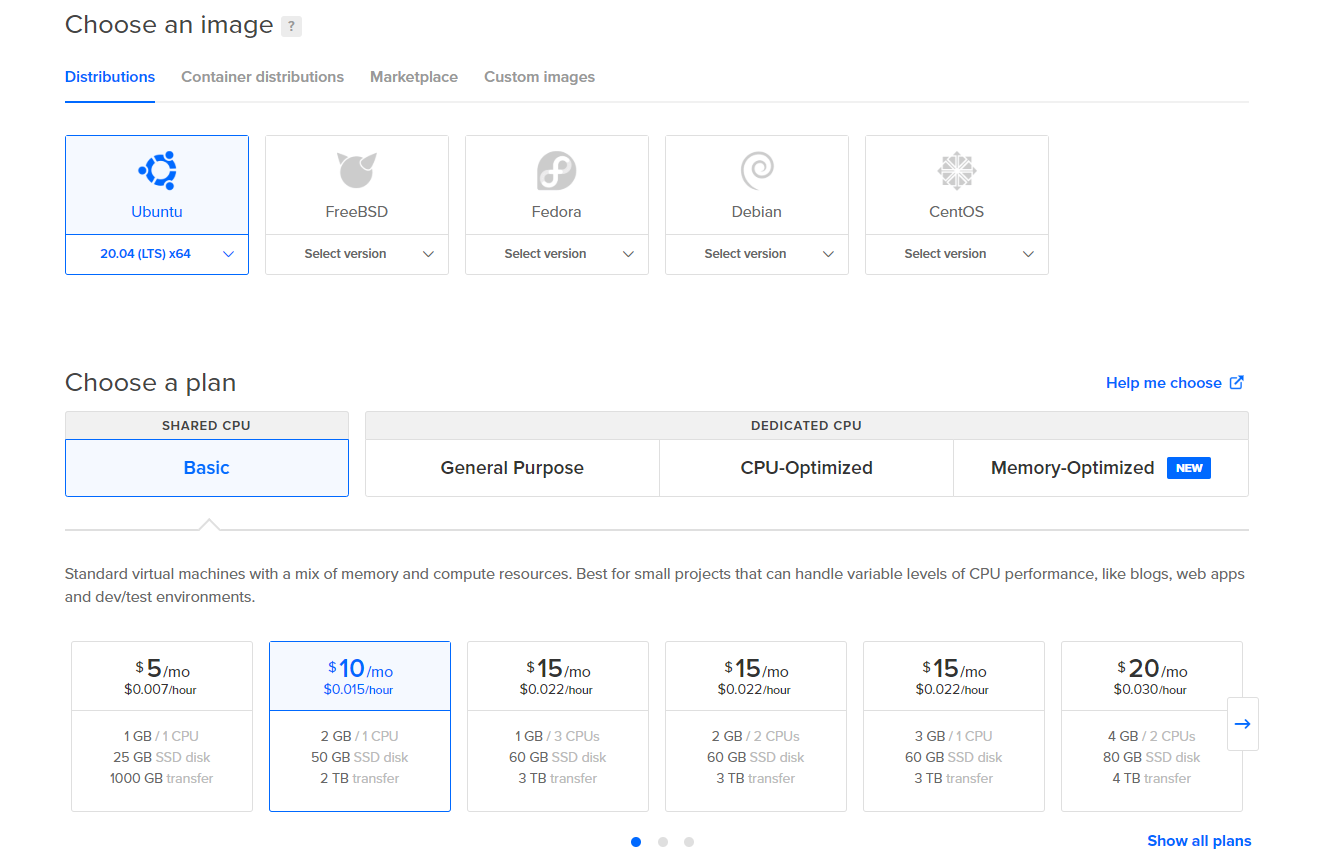 then at the bottom, choose Create Droplet.once the droplet is created, login
to the server using putty:https://www.putty.org/
then at the bottom, choose Create Droplet.once the droplet is created, login
to the server using putty:https://www.putty.org/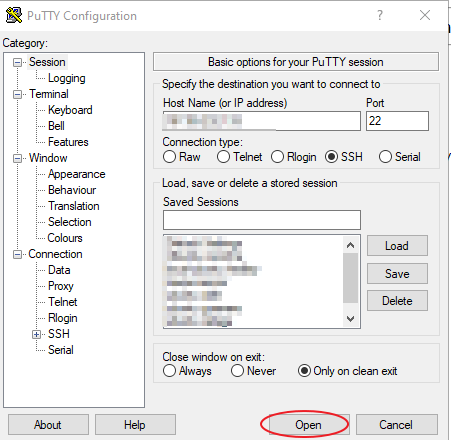 press Open then put the credentials of the server and that’s it. now
you are in the server.
press Open then put the credentials of the server and that’s it. now
you are in the server.
To prevent all your clients from timing out you need to edit
nano /etc/ssh/sshd_config
which is the server side configuration file add these two options:
ClientAliveInterval 120
ClientAliveCountMax 720
then restart ssh:
sudo systemctl restart sshd
adding ssh to ufw:
sudo ufw allow ssh
Configure ftp server
install ftp
apt-get install vsftpd
then open the next file:
nano /etc/vsftpd.conf
and put the next options as follows:
anonymous_enable=NO
local_enable=YES
write_enable=YES
local_umask=022
finally we restart the service
sudo service vsftpd restart
then you can use a ftp client to log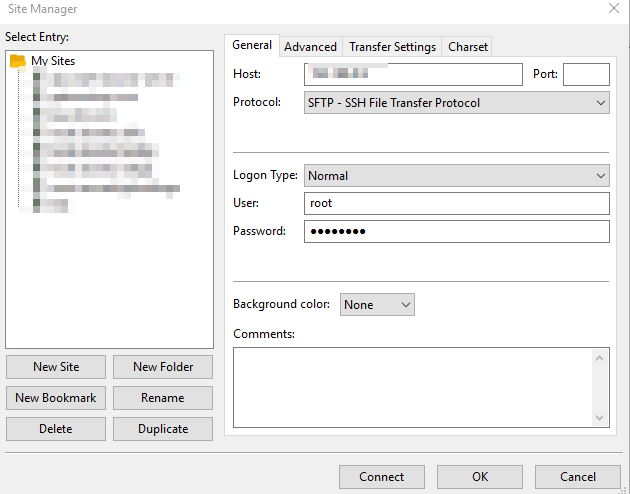
INSTALLING POSTFIX
update first:
apt-get update
apt -y install postfix sasl2-bin
then choose internet-site option
then on system mail name, I added mydomain.com
Also set a hostname for the server so that emails will show a from address with valid domain section.
sudo hostnamectl set-hostname mydomain.com
For making test, install this:
sudo apt-get install mailutils
then we will make a test
echo "Test Email message body" | mail -s "Email test subject" [email protected]
Optional: To reconfigure the postfix package:
sudo dpkg-reconfigure postfix
INSTALLING MARIADB
just install using the commands:
sudo apt install mariadb-server mariadb-client
check mysql version
mysql -V
After installing the server above, run the commands below to set a root password, remove the test database and disable the root from logging on remotely.
sudo mysql_secure_installation
When prompted, answer the questions below by following the guide. Enter current password for root (enter for none): Just press the Enter Set root password? [Y/n]: Y New password: Enter password Re-enter new password: Repeat password Remove anonymous users? [Y/n]: Y Disallow root login remotely? [Y/n]: Y Remove test database and access to it? [Y/n]: Y Reload privilege tables now? [Y/n]: Y
Restart MariaDB server
sudo systemctl restart mariadb.service
then we will create a new mysql user, so we will log into mysql
mysql -uroot mysql
once logged, put the next code
CREATE USER 'admin'@'localhost' IDENTIFIED BY 'yourpassword';
GRANT ALL PRIVILEGES ON *.* TO 'admin'@'localhost';
FLUSH PRIVILEGES;
quit;
then you can connect from any mysql client to your server
After installing MariaDB, the commands below can be used to stop, start and enable MariaDB service to always start up when the server boots.
sudo systemctl stop mariadb.service
sudo systemctl start mariadb.service
sudo systemctl enable mariadb.service
To configure MariaDB in Ubuntu 20.04 LTS you must take into account that the configuration files are organized in the path / etc / mysql /. Typically the main file is usually my.cnf, but in the MariaDB version of the Ubuntu 20.04 repositories this file only indicates that other files are loaded in the conf.d / and mariadb.conf.d / subdirectories.
For service configuration, the most important file is 50-server.cnf.View a List of MySQL Users
Viewing a full list of MySQL users, including the host they’re associated with, can be done with the following select statement:
SELECT User,Host FROM mysql.user;Remove a MySQL User
To remove a user from MySQL, we again use the DROP command.
It only takes one simple command to delete a user in MySQL, but BEWARE; dropping a user can not be undone! The command is as follows:
DROP USER 'testuser'@'localhost';
Remote access
By default MariaDB only listens for local connections, so if we are interested in allowing network connections we will have to edit the MariaDB Server configuration file in Ubuntu 20.04:
sudo nano /etc/mysql/mariadb.conf.d/50-server.cnf
We look for the bind-address directive:
...
bind-address = 127.0.0.1
...
To allow network access, simply disable the directive by inserting a # character at the beginning of the line:
...
# bind-address = 127.0.0.1
...
We save the changes and restart the service:
sudo systemctl restart mariadb
How to configure Ubuntu 20.04 UFW firewall for MariaDBIf you have the UFW firewall activated in Ubuntu 20.04 it will be necessary to add a rule to allow incoming connections to MariaDB:
sudo ufw allow mysql
The setting takes immediate effect, so we can test remote connections.
To check remote access, we will connect from another machine that has the mysql console client installed, specifying as parameters the IP address or domain of the Ubuntu 20.04 server and the user with whom we want to access MariaDB:
install and configure mariadb in ubuntu 20.04 focal fossaAnd we will verify that the connection is possible, being able to work as in a local terminal.
You can use these commands to allow port 3306 through UFW
sudo ufw allow out 3306/tcp

 sudo ufw allow in 3306/tcp
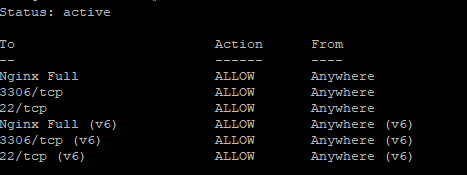
And to check that the rules have been added
sudo ufw status
at this point, you should have your ufw like this:
Installing MariaDB on Ubuntu 18.04 from the MariaDB Repositories
At the time of writing this article, the latest version of MariaDB available from the official MariaDB repositories is MariaDB version 10.3. Before continuing with the next step you should visit the MariaDB Repository page and check if there is a new version available.
To install MariaDB 10.3 on your Ubuntu 18.04 server perform the following steps:
First add the MariaDB GPG key to your system using the following command:
sudo apt-key adv --recv-keys --keyserver hkp://keyserver.ubuntu.com:80 0xF1656F24C74CD1D8
Once the key is imported, add the MariaDB repository with:
sudo add-apt-repository 'deb [arch=amd64,arm64,ppc64el] http://ftp.utexas.edu/mariadb/repo/10.3/ubuntu bionic main'
If you get an error message saying add-apt-repository command not found install the software-properties-common package.
To be able to install packages from the MariaDB repository you’ll need to update the packages list:
sudo apt update
Now that the repository is added install the MariaDB package with:
sudo apt install mariadb-server
The MariaDB service will start automatically, to verify it type:
sudo systemctl status mariadb
● mariadb.service – MariaDB 10.3.8 database serverLoaded: loaded (/lib/systemd/system/mariadb.service; enabled; vendor preset: enabled)Drop-In: /etc/systemd/system/mariadb.service.d└─migrated-from-my.cnf-settings.confActive: active (running) since Sun 2018-07-29 19:36:30 UTC; 56s agoDocs: man:mysqld(8)https://mariadb.com/kb/en/library/systemd/Main PID: 16417 (mysqld)Status: “Taking your SQL requests now…”Tasks: 31 (limit: 507)CGroup: /system.slice/mariadb.service└─16417 /usr/sbin/mysqld
And print the MariaDB server version, with:
mysql -V
mysql Ver 15.1 Distrib 10.3.8-MariaDB, for debian-linux-gnu (x86_64) using readline 5.2
Securing MariaDB
Run the mysql_secure_installation command to improve the security of the MariaDB installation:
sudo mysql_secure_installation
The script will prompt you to set up the root user password, remove the anonymous user, restrict root user access to the local machine and remove the test database. At the end the script will reload the privilege tables ensuring that all changes take effect immediately.
All steps are explained in detail and it is recommended to answer “Y” (yes) to all questions.
For removing mariadb:
There are a few other options which might be of use:
sudo apt-get remove mariadb-server
This will remove just the mariadb-server package itself.
sudo apt-get remove --auto-remove mariadb-server
This will remove the mariadb-server package and any other dependant packages which are no longer needed.
If you also want to delete your local/config files for mariadb-server then this will work.
sudo apt-get purge --auto-remove mariadb-server
but be careful with that last one.
ref:https://www.ostechnix.com/install-nginx-mariadb-php-lemp-stack-ubuntu-16-04-lts/
Install PHP 7.4 and Related Modules
WordPress is a PHP based application, and PHP is required to run it. Since some versions of Ubuntu don’t have the latest version of PHP, you can add a third-party PPA repository to install PHP from there.
The command below will add a third-party PPA to Ubuntu.
sudo apt-get install software-properties-common
sudo add-apt-repository ppa:ondrej/php
Then update and upgrade to PHP 7.4
sudo apt update
Next, run the commands below to install PHP 7.4 and related modules.
sudo apt install php7.4-fpm php7.4-common php7.4-mysql php7.4-gmp php7.4-curl php7.4-intl php7.4-mbstring php7.4-xmlrpc php7.4-gd php7.4-xml php7.4-cli php7.4-zip
After installing PHP 7.4, go and configure some basic settings that may be required for WordPress to function properly.
Run the commands below to open PHP
sudo nano /etc/php/7.4/fpm/php.ini
Below are good settings to configure for most WordPress websites.
file_uploads = On
allow_url_fopen = On
short_open_tag = On
memory_limit = 256M
cgi.fix_pathinfo = 0
upload_max_filesize = 100M
max_execution_time = 360
date.timezone = America/Chicago
That should get PHP 7.4 installed with some basic settings to allow WordPress to function.
INSTALLING NGINX
installing nginx
sudo apt install nginx
ALLOW HTTP TRAFFIC
sudo ufw allow 'Nginx Full'
sudo ufw status
Next, test to make sure that there are no syntax errors in any of your Nginx files:
sudo nginx -t
If no problems were found, restart Nginx to enable your changes:
sudo systemctl restart nginx
Nginx should now be serving both of your domain names.
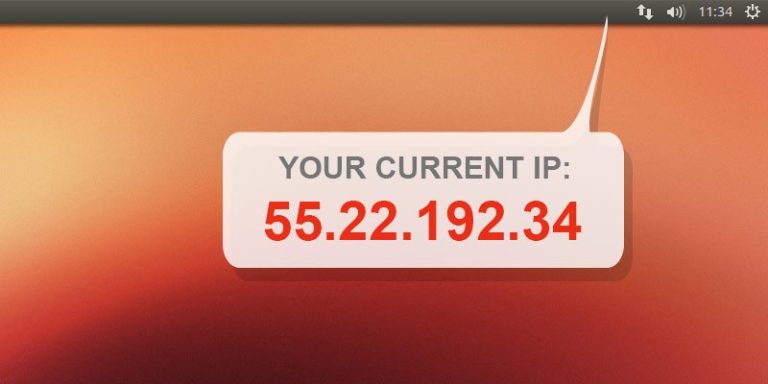
then you can check if it is working fine. just open a browser and put the ip
of your server. it would look like this: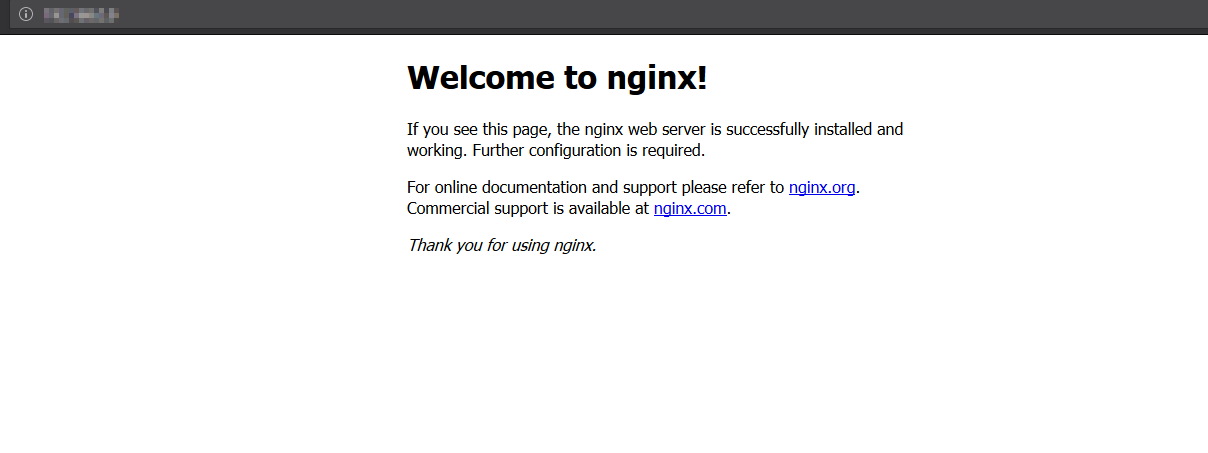
You can check the status of UFW by running the following command in a SSH shell:
sudo ufw status
If UFW is not currently configured or running, you should see a message indicating that UFW is inactive:
Status: inactive
If UFW is inactive, you can activate it by running the following commands:
sudo ufw disable
sudo ufw enable
After disabling and enabling UFW, it should now be in an active status.How to fix the NGINX error “Failed to read PID from file”, quick and easy
Here’s a tip on how to fix the error message:
nginx.service: Failed to read PID from file /run/nginx.pid: Invalid argument
quick and easy. This fix should do it for you.
This behavior is a known bug, caused by a race condition between nginx and systemd. Systemd is expecting the PID file to be populated before nginx had the time to create it.
To fix the error, you have basically two options.
Option 1: create the PID file
To fix the error, you have to create the PID file manually.
Step 1. Create the directory /etc/systemd/system/nginx.service.d
Create a directory named nginx.service.d in /etc/systemd/system/:
mkdir /etc/systemd/system/nginx.service.d
Should the system complain that it already exists, ignore and move on to Step 2.
Step 2. Print data to file
Execute:
printf "[Service]\nExecStartPost=/bin/sleep 0.1\n" > /etc/systemd/system/nginx.service.d/override.conf
This is a one-liner. printf will write its output into the configuration file /etc/systemd/system/nginx.service.d/override.conf.
Step 3. Reload the daemon
Reload systemd manager configuration:
systemctl daemon-reload
This will rerun all generators, reload all unit files and recreate the entire systemd dependency tree.
Step 4. Restart NGINX
This line will restart NGINX for you:
systemctl restart nginx
The error should be fixed now.
Option 2: an alternative workaround
Another workaround is removing the PIDFile option and adding the line:
ExecStopPost=/bin/rm -f /run/nginx.pid
You can find the full documentation of this bug at:
https://bugs.launchpad.net/ubuntu/+source/nginx/+bug/1581864
If you experience this problem, SELinux could be preventing php-fpm from accessing a port. Just a hint. Try
journalctl -xe
for guidance on your next steps.
Create WordPress Database
When all the servers installed above, it’s now time to begin setting up WordPress environment. First, run the steps below to create a blank database for WordPress to use.
Logon to MariaDB database console using the commands below:
sudo mysql -u root -p
Then create a database called wpdb
CREATE DATABASE wpdb;
Next, create a database user called wpdbuser and set password
CREATE USER 'wpdbuser'@'localhost' IDENTIFIED BY 'new_password_here';
Then grant the user full access to the database.
GRANT ALL ON wpdb.* TO 'wpdbuser'@'localhost' WITH GRANT OPTION;
Finally, save your changes and exit.
FLUSH PRIVILEGES;
EXIT;
Download WordPress
At this point, WordPress is ready to be downloaded and installed. Use the commands below to download the latest version of WordPress.
cd /tmp
wget https://wordpress.org/latest.tar.gz
tar -xvzf latest.tar.gz
sudo mv wordpress /var/www/wordpress
Then run command below to allow www-data user to own the WordPress directory.
sudo chown -R www-data:www-data /var/www/wordpress/
sudo chmod -R 755 /var/www/wordpress/
Configure Nginx
Below is where you configure Nginx VirtualHost file for the WordPress site you’re creating. This file defines how client requests are handled and processed.
Run the commands below to create a new VirtualHost file called wordpress in the /etc/nginx/sites-available/ directory.
sudo nano /etc/nginx/sites-available/wordpress
A very good configuration settings for most WordPress site on Nginx server is below. This configuration should work great.
Copy the content below and save into the file created above.
server {
 listen 80;
 listen [::]:80;
 root /var/www/wordpress;
 index index.php index.html index.htm;
 server_name example.com www.example.com;
 client_max_body_size 100M;
 autoindex off;
 location / {
 try_files $uri $uri/ /index.php?$args;
 }
 location ~ \.php$ {
 include snippets/fastcgi-php.conf;
 fastcgi_pass unix:/var/run/php/php7.4-fpm.sock;
 fastcgi_param SCRIPT_FILENAME $document_root$fastcgi_script_name;
 include fastcgi_params;
 }
}
Save the file and exit.
After saving the file above, run the commands below to enable the new site, then restart Nginx server.
sudo ln -s /etc/nginx/sites-available/wordpress /etc/nginx/sites-enabled/wordpress
sudo systemctl restart nginx.service
At this stage, WordPress is ready and can be launched by going to the server’s IP or hostname.
http://localhost
However, if you want to enable SSL or accept web traffic over HTTPS, then you can continue below to install and configure Let’s Encrypt free SSL certificates.
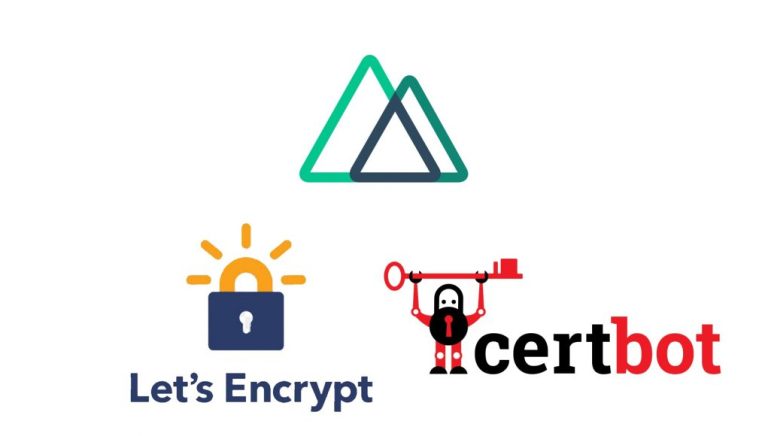
Install Let’s Encrypt Wildcard Certificates
WordPress is ready to use without SSL. However, if you want to serve web traffic over HTTPS, then installing and configuring Let’s Encrypt SSL certificate or other public certificates is a must.
To install Let’s Encrypt, run the commands below.
sudo apt update
sudo apt-get install letsencrypt
The commands above will install certbot tool and all dependencies that will be allowed to make the tool function.
Let’s Encrypt provides many ways to challenge you to validate that you own the domain you want to provide SSL certificates for. You will not be able to generate certificates if you can’t prove that you own the domain you want to secure.
For wildcard certificates, the only challenge method Let’s Encrypt accepts is the DNS challenge, which we can invoke via the preferred-challenges=dns flag.
So, to generate a wildcard cert for domain *.example.com, you run the commands below:
sudo certbot certonly --manual --preferred-challenges=dns --email
    [email protected] --server https://acme-v02.api.letsencrypt.org/directory
    --agree-tos -d example.com -d *.example.com
The command options above are explained below:certonly: Obtain or renew a certificate, but do not install –manual: Obtain certificates interactively –preferred-challenges=dns: Use dns to authenticate domain ownership –server: Specify the endpoint to use to generate –agree-tos: Agree to the ACME server’s subscriber terms -d: Domain name to provide certificates for
After executing the command above, Let’s Encrypt will provide a text string to add a text record to your DNS entry…
Example:
Saving debug log to /var/log/letsencrypt/letsencrypt.log
Plugins selected: Authenticator manual, Installer None
-------------------------------------------------------------------------------
Would you be willing to share your email address with the Electronic Frontier
Foundation, a founding partner of the Let's Encrypt project and the non-profit
organization that develops Certbot? We'd like to send you email about EFF and
our work to encrypt the web, protect its users and defend digital rights.
-------------------------------------------------------------------------------
(Y)es/(N)o: y
Obtaining a new certificate
Performing the following challenges:
dns-01 challenge for example.com
-------------------------------------------------------------------------------
NOTE: The IP of this machine will be publicly logged as having requested this
certificate. If you're running certbot in manual mode on a machine that is not
your server, please ensure you're okay with that.
Are you OK with your IP being logged?
-------------------------------------------------------------------------------
(Y)es/(N)o: y
-------------------------------------------------------------------------------
Please deploy a DNS TXT record under the name
_acme-challenge.example.com with the following value:
x4MrZ6y-JqFJQRmq_lGi9ReRQHPa1aTC9J2O7wDKzq8
Before continuing, verify the record is deployed.
Go to your DNS provider portal and add a text record for the string above and save…

Wait a few mins before continuing from the prompt.
Some DNS providers take a wile to propagate changes so it may depend on your provider’s platform.
After the changes above and Let’s encrypt is able to validate that you own the domain, you should see a successful message as below:
IMPORTANT NOTES:
 - Congratulations! Your certificate and chain have been saved at:
 /etc/letsencrypt/live/example.com/fullchain.pem
 Your key file has been saved at:
 /etc/letsencrypt/live/example.com/privkey.pem
 Your cert will expire on 2020-01-09. To obtain a new or tweaked
 version of this certificate in the future, simply run certbot
 again. To non-interactively renew *all* of your certificates, run
 "certbot renew"
The wildcard certificate is now generated and ready to be used.
To verify that the certificate is ready, run the commands below:
sudo certbot certificates
That should display similar screen as below:
Found the following certs:
 Certificate Name: example.com
 Domains: *.example.com
 Expiry Date: 2020-01-05 07:48:04+00:00 (VALID: 85 days)
 Certificate Path: /etc/letsencrypt/live/example.com/fullchain.pem
 Private Key Path: /etc/letsencrypt/live/example.com/privkey.pem
Now, Let’s Encrypt’s certificates are valid for 90 days… You’ll want to setup a crob job to automate the renewal process… To do that, open crontab and add the entry below:
sudo crontab -e
Then add the line below and save…
0 1 * * * /usr/bin/certbot renew >>
    /var/log/letsencrypt/renew.log
Save and you’re done!
With Let’s Encrypt installed, reopen Nginx VirtualHost file created above and add Let’s Encrypt configurations to secure your website.
Run the commands below open the file.
sudo nano /etc/nginx/sites-available/wordpress
Then add the highlighted lines to the VirtualHost file as shown below:
server {
 listen 80;
 listen [::]:80;
 server_name *.example.com;
 return 301 https://$host$request_uri;
}
server {
 listen 443 ssl http2;
 listen [::]:443 ssl http2;
 root /var/www/wordpress;
 index index.php;
 server_name *.example.com;
 if ($host != "example.com") {
 return 301 https://example.com$request_uri;
 }
 ssl_certificate /etc/letsencrypt/live/example.com/fullchain.pem;
 ssl_certificate_key /etc/letsencrypt/live/example.com/privkey.pem;
 ssl_trusted_certificate /etc/letsencrypt/live/example.com/chain.pem;
 ssl_protocols TLSv1 TLSv1.1 TLSv1.2 TLSv1.3;
 ssl_ciphers 'TLS13+AESGCM+AES128:ECDHE-ECDSA-CHACHA20-POLY1305:ECDHE-RSA-CHACHA20-POLY1305:ECDHE-ECDSA-AES128-GCM-SHA256:ECDHE-RSA-AES128-GCM-SHA256:ECDHE-ECDSA-AES256-GCM-SHA384:ECDHE-RSA-AES256-GCM-SHA384:DHE-RSA-AES128-GCM-SHA256:DHE-RSA-AES256-GCM-SHA384:ECDHE-ECDSA-AES128-SHA256:ECDHE-RSA-AES128-SHA256:ECDHE-ECDSA-AES128-SHA:ECDHE-RSA-AES256-SHA384:ECDHE-RSA-AES128-SHA:ECDHE-ECDSA-AES256-SHA384:ECDHE-ECDSA-AES256-SHA:ECDHE-RSA-AES256-SHA:DHE-RSA-AES128-SHA256:DHE-RSA-AES128-SHA:DHE-RSA-AES256-SHA256:DHE-RSA-AES256-SHA:ECDHE-ECDSA-DES-CBC3-SHA:ECDHE-RSA-DES-CBC3-SHA:EDH-RSA-DES-CBC3-SHA:AES128-GCM-SHA256:AES256-GCM-SHA384:AES128-SHA256:AES256-SHA256:AES128-SHA:AES256-SHA:DES-CBC3-SHA:!DSS';
 ssl_prefer_server_ciphers on;
 ssl_session_cache shared:SSL:50m;
 ssl_session_timeout 1d;
 ssl_session_tickets off;
 ssl_ecdh_curve X25519:sect571r1:secp521r1:secp384r1;
 client_max_body_size 100M;
 autoindex off;
 location / {
 try_files $uri $uri/ /index.php?$args;
 }
 location ~ \.php$ {
 include snippets/fastcgi-php.conf;
 fastcgi_pass unix:/var/run/php/php7.4-fpm.sock;
 fastcgi_param SCRIPT_FILENAME $document_root$fastcgi_script_name;
 include fastcgi_params;
 }
}
After the above, restart Nginx and PHP 7.4-FPM
sudo systemctl reload nginx
sudo systemctl reload php7.4-fpm
Next, open your browser and browse to the server domain name. You should see WordPress setup wizard to complete. Please follow the wizard carefully.