Changing permalinks of your website is a serious thing, because if you do it the wrong way, you will lose all your traffic,
I learned it the hard way!
Did you know that changing permalink structure can improve on-page SEO for your entire website?
A simple trick that I couldn’t find anywhere could save me a lot of SEO troubles.
Stick with me and I will share everything you need to know about changing permalinks in WordPress without breaking links or losing traffic.
Optimising your URLs will help you get better rankings and more traffic to your site.
What Is a Permalink?
A permalink or permanent link is the full URL of a web page or entry in your blog.
For example, the permalink of this post is:
“softdiscover.com/tutorials/changing-permalinks-wordpress-better-page-seo”
You can see this URL on the address bar at the top of your web browser.
Why Permalink Is So Important?
Permalink is a an important on-page SEO factor.
When you search google for a keyword, almost all first-page results include the exact keyword or some variation of it in their URLs.
For example, here are the top 6 results in Google when I searched for “keyword research tool”:
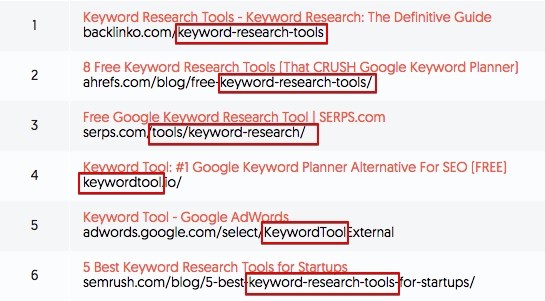
As you can see, the keyword exists in the URL of each post.
Clean and keyword-rich permalinks are also more readable and have better impressions on users.
A short and descriptive URL results in higher CTR which is another important positive SEO factor.
What Is The Best Permalink Structure For SEO?
There are two important rules you need to follow:
Rule #1: Include your targeted SEO keywords and ideally not anything more in the URLs
You should include related phrases to your targeted keywords in the URL. Otherwise, you will have hard time to rank on the first page of Google.
If you include unnecessary words in the URL, your main keywords look less important in the eyes of search engines. That’s why you should avoid them.
Rule #2: Keep URLs as short as possible
According to Ahrefs, shorter URLs tend to rank better.
Here is the chart that shows the correlation between the number of characters in the URL and ranking:
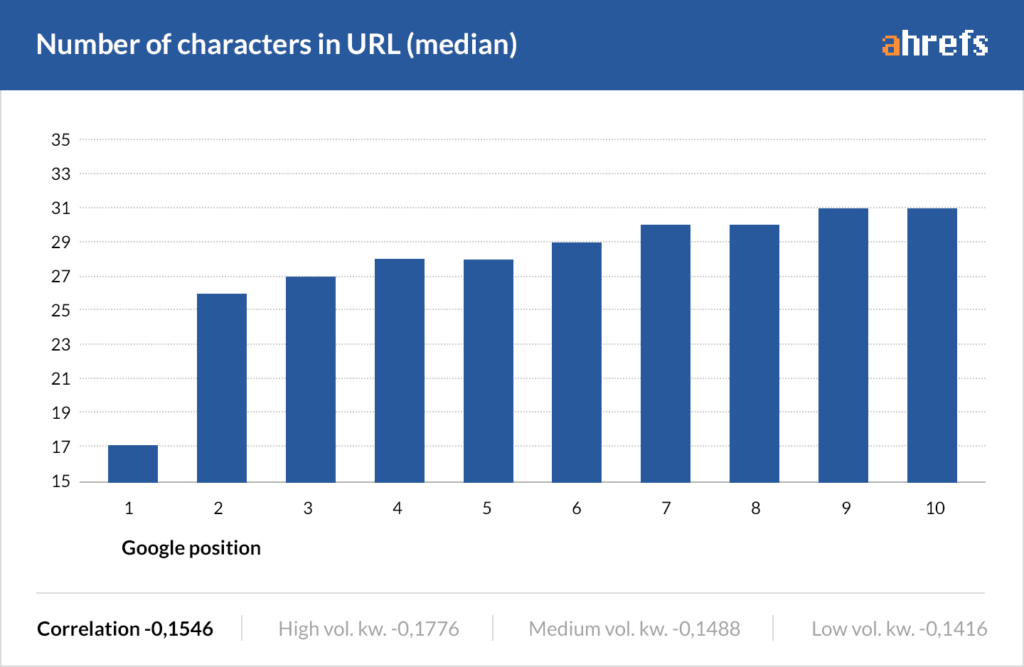
Short URLs are also more readable.
So, eliminate anything from the URL except the few main words from your targeting keyword.
Fortunately:
WordPress allows you to choose the permalink structure of all of your posts easily in a few seconds.
Change Permalinks in WordPress
You can easily control URLs of your posts in WordPress.
However,
If you have published posts on your site, you should be very careful when changing their links.
List of your current URLs
In this case, you should create a list of all your current URLs before taking changing permalinks.
You can do this simply by saving your current blog sitemap.
Here is how to do it:
If you use “All In One SEO” plugin,
Go to the XML sitemap section and click on the “view your XML sitemap”:
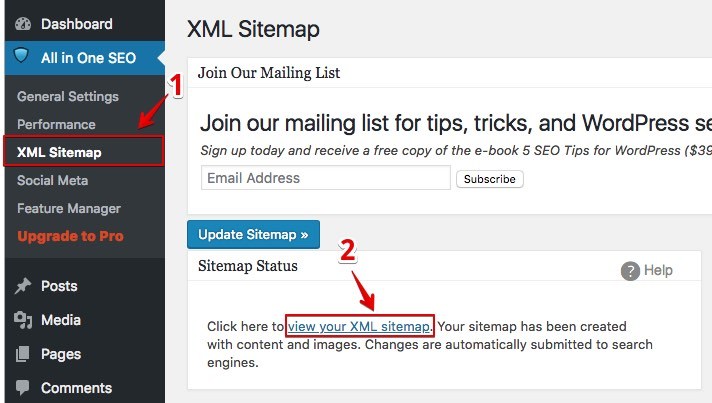
Then, use Ctrl+a in windows (Command+a in mac) to select all of the content and paste it into a spreadsheet and save it as “CSV” file.
If you use “Yoast” plugin,
Click on the general setting:
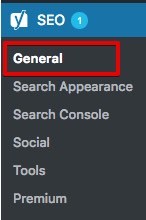
Go to the features tap:
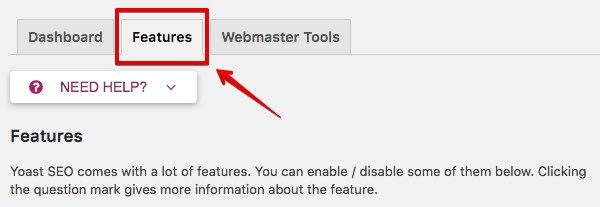
Click on the question mark near the XML sitemap, and open “See the SML sitemap” link:
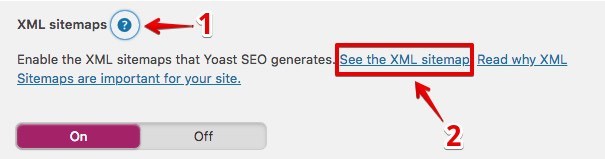
Finally, click on the post sitemap:
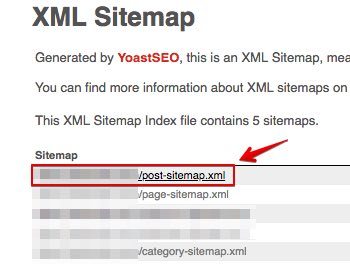
Now, you see a page with a list of all your posts URLs.
Use Ctrl+a in windows (Command+a in mac) to select all of the content and paste it into a spreadsheet and save it as “CSV” file.
If you use other plugins,
Simply go the URL of the sitemap and save it as PDF. Usually, it is located at “example.com/sitemap.xml”.
You will need the list of your current URLs for redirection purposes.
In order to avoid broken links and traffic loss, you should take two more steps after changing the links (I will explain each step in detail):
If your website is new and you haven’t published any posts yet, you can set the new permalink structure without doing anything else (Just follow section 1).
Section 1: Change Permalinks Structure For Better SEO
Step 1
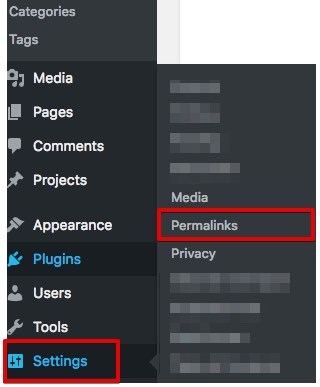
In the admin panel of your WordPress website, go to:
settings > permalinks:
Step 2
Choose one of the structures in the permalink settings:

For example, if you choose “Day and name”:
A post with the title “What Is The Best Blogging Platform” on your blog that is published on 2019/04/12 is automatically attached to this URL:
“example.com/2019/04/12/what-is-the-best-blogging-platform”
This URL is long, ugly, and has a lot of useless characters. So, this is not a good permalink structure.
The best one is the “Post name” option.
Choose the “Post name” structure unless you have a strong reason for using another one.
It is short, clean and SEO friendly.
You also need to take one extra step each time you publish a post.
You should change the permalink of each post.
In the above example, the “Post name” structure automatically generates this URL:
“example.com/what-is-the-best-blogging-platform”
While the annoying numbers are gone, it is still too long.
You should edit it in the permalink section of your editor:
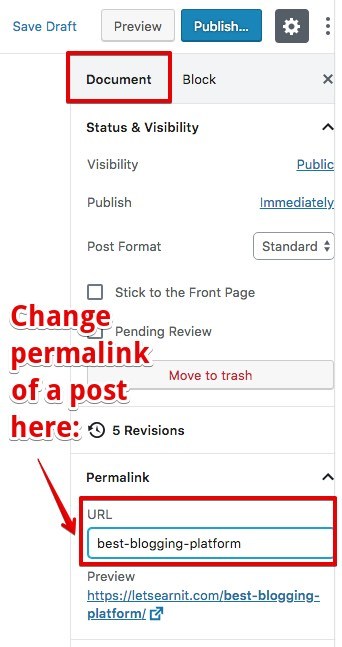
A good approach is to include only the most relative words. In this example, the final permalink would be:
“example.com/best-blogging-platform”
This link includes the targeted keyword while it is short and easily readable.
Section 2: Revert The Changes For URLs That Are Already Performing Well
( If your site is new and you haven’t published anything yet, you can skip this section )
Do you have posts that are currently ranking on the first page?
Then, don’t risk changing their links.
Because
Even if you redirect them correctly, the traffic may decline.
I learned this the hard way and I lost a considerable amount of organic traffic in one of my websites.
Even though the solution is really simple, I couldn’t find it anywhere.
Here, I will share the solution with you:
You can avoid possible issues by reverting the changes for pages that are already performing well.
This way:
- You improve the permalink structure of all of your pages
- Your future posts rank better in Google
- Pages that are working good and getting a decent amount of organic traffic won’t be affected
Follow these simple steps and your important pages stay absolutely safe:
Step 1: List Your Important pages
You probably know which pages are getting a good traffic from search engines.
But, to make sure you don’t miss anything:
Go to the Google search console and choose pages in in the performance section. Then, sort the pages by traffic. Create a list of pages that are getting a good traffic.
You can also use other tools like Semrush, Ahref, etc instead of the search console to find your valuable pages.
Step 2: Use Custom Permalinks To Revert The Change For Each Page On The List
Most of the time, you can’t use WordPress permalink to revert the change.
Why?
Because WordPress doesn’t allow you to include ” / ” in the slug of a page and it automatically replace it with ” – “.
The solution is to use custom permalinks plugin. It allows you to use ” / ” in the slug of each post. In other words, this plugin lets you choose a permalink structure for each post.
Here are the steps:
Step 1
Install and activate WordPress custom permalinks plugin.
Step 2
Open the list of the URLs of your important pages. And set the old permalink for each page.
For example:
The new URL of our example is:
“example.com/best-blogging-platform”
When the custom permalinks plugin is active, you can change this to the original URL which was:
“example.com/2019/04/12/what-is-the-best-blogging-platform”

This way
All of your important links are unchanged and you certainly don’t face any SEO troubles.
Do this for every important post that you don’t want to change its URL.
The bottom-line is that:
Your new posts will have better permalink structures while you don’t touch your old important pages.
Section 3: Redirect Old Permalinks
( If your site is new and you haven’t published anything yet, you can skip this section )
You may have a lot of published posts when you are changing the permalink structure.
You revert the changes for the pages that are already performing good.
However,
You have a lot of other pages which are not ranking good.
In this case,
It’s better to use the new permalink structure for them.
This way,
They look better and more readable while the new improvement in their URLs can help them rank better on search engines.
But
You should take an important step to avoid broken links:
Redirecting the old links to the new ones.
So that
Search engines know that the links are changed and your old links serve to redirect the traffic to the new URLs.
Redirection Types
There are five types of redirections. Each type has a code so that crawl bots understand the purpose of them: 301, 302, 303, 307, 308.
A 301 redirect has a permanent status. It means your link is changed forever. You should use the permanent redirect for all of your changed URLs.
You have many options to redirect your old links.
Here is how you can redirect links :
Redirecting Your Old Links Using The Redirection Plugin
Redirection plugin helps you to easily redirect your old links.
Here are the steps:
Step 1
Install and activate redirection plugin.
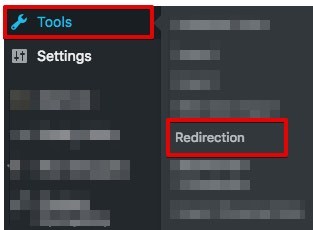
Step 2
Go to the redirection settings:
Step 3:
Create a redirection for each link. In our example, if you want to change the URL of the post, you should create a redirection like this:

Alternative Way To Redirect All Your Old Links Automatically
If you have a huge number of pages and you want to change the URL of all of them, you can do it automatically using the simple 301 redirection plugin.
This way
You don’t need to redirect URLs one by one. You can automatically redirect all of them.
Here is how to do it:
Step 1
Open the CSV file containing your old URLs. I explained how to generate it in section 1.
Step 2
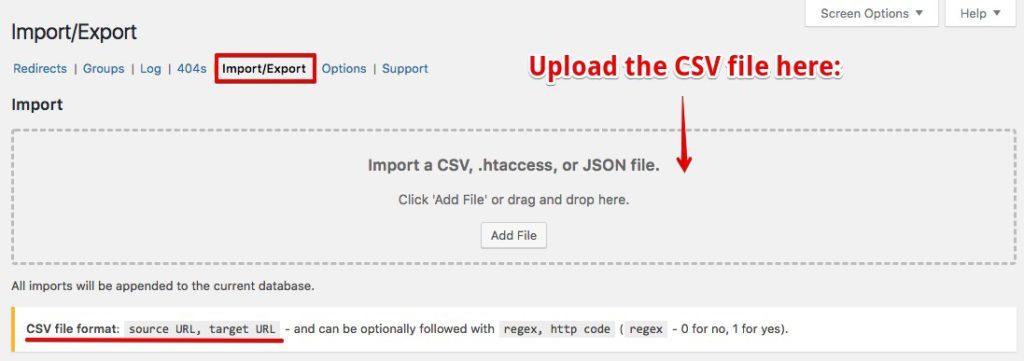
The CSV file should include two columns.
The first column should be the list of your old URLs and the second column should be the list of new URLs.
It should already contain the old URLs in the first column.
For adding the list of new URLs:
After changing the permalink structure of your site, go the sitemap of your website and copy the list of the new links into the CSV file.
The final version of your CSV file should look like this:

Step 3
Remove the links of your important pages from your list (Pages that you revert the changes for them)
Step 4
Install and activate the redirection plugin.
Step 5
Go to the redirection settings:
Step 6
Click on the import/export tab and upload the CSV file:
What About Redirection Using .htaccess file?
I think it’s not a good idea to touch the .htaccess for redirecting your URLs. It’s a critical file and if you make a mistake, it can cause you serious troubles.
Redirection in WordPress can be simply achieved with the mentioned plugins without risking anything.
For this reason, I do not cover it here but if you have enough experience and you need to create different rules for redirection you can use .htaccess file.
Conclusion, Do You Really Need To Change Your Permalinks?
URLs are an important on-page SEO factor and WordPress make it really easy to change your permalink structure.
So, if your permalink structure is not optimized yet, you should consider changing it as soon as possible. This will help you rank better and get more traffic.
At least, you should optimise the URLs of your future posts.
To recap everything:
If your site is new, you simply change the permalinks as explained and that’s it.
If your site has published posts, you should take two more steps after changing the permalinks:
- Reverting the changes for important pages so they are not affected
- Create redirections for changed links. You can do it one by one or automatically with a CSV file
That’s it.
Let me know if you have any questions or comments.
And, don’t forget to share this if you find it helpful.