Introduction
One way to send and receive email through your own custom domain is to use a third-party mail service, such as Zoho or Google Apps. The main benefit of using a third-party mail service, as opposed to managing your own mail server, is that you can avoid performing the ongoing maintenance that running a mail server entails. Of course, mail services for custom domains typically come with a fee, but Zoho offers a free mail service for up to 10 users on a single custom domain.
This tutorial will show you how to set up Zoho Mail with your custom domain that is managed by DigitalOcean’s Domain Name Servers. Also, we will show you how to use the mail setup to send mail from your applications using your custom domain.
Prerequisites
Before proceeding, you should own the domain name that you want to use as your mail domain. This guide also assumes that you are using the DigitalOcean DNS to manage your domain.
If you do not already own a domain, you may purchase one from any of the various domain registrars. Once you have a domain to use, you may use this guide to set it up under the DigitalOcean DNS:
You may also want to point the domain to one of your droplets, such as one that hosts your web server. This link will help you set that up:
Once you have a domain, and it’s managed by DigitalOcean’s DNS, you are ready to proceed!
Sign Up
Before using Zoho, you must register with them here: Sign up. You may register with an external email address or with a variety of OAuth options, such as Google Apps, Facebook, etc.
Once you are registered, ensure that you are signed in, then continue to choose your mail service plan.
Choose Plan
After you are signed in, you will be taken to the Zoho home page. From here, click on the Mail link.
Ensure that the Add your existing domain option is selected. Then select the desired plan.
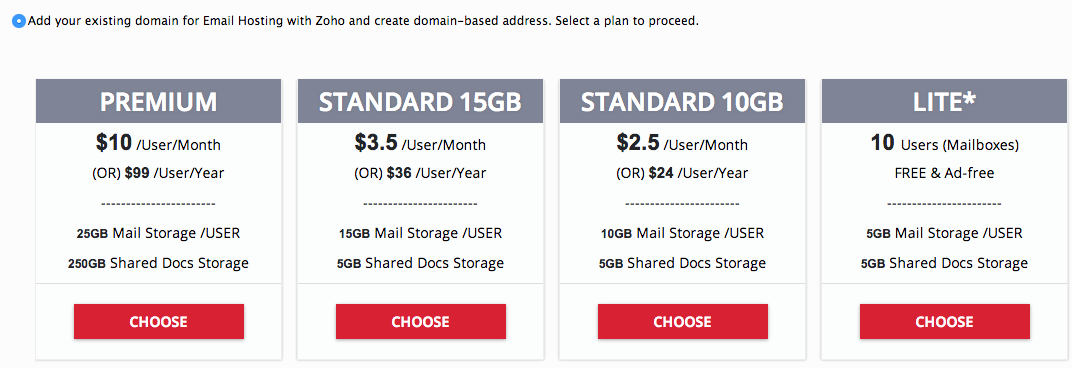
For this tutorial, we will select the Lite plan, which is free and provides up to 10 mailboxes. If you have the need for more than 10 mailboxes, or if you need more storage, feel free to select one of the priced plans.
After selecting your desired plan, you must provide the domain name that you want to use with the mail service:

After providing your domain name, click the Add Domain button.
Next, click on the Proceed to verify domain ownership link. At this point, you are ready to verify your ownership of your domain to Zoho.
Verify Your Domain
Zoho provides three different ways to verify the ownership of your domain. We will use the CNAME Method which involves creating a specific CNAME record in your domain’s DNS record.
At this point, you should be at the Domain Setup screen on the Zoho site, which should look something like this:
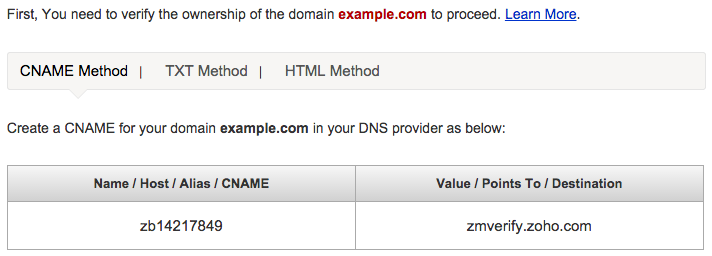
Take a note of the CNAME and Destination items, as the next step is to create a CNAME record based on those values in the DigitalOcean DNS manager.
In a separate browser tab or window, go to the Networking section of the DigitalOcean Control Panel. Click on the domain in question to view and edit its records:

Next, in the Create new record section near the top of the page, select the CNAME record type.
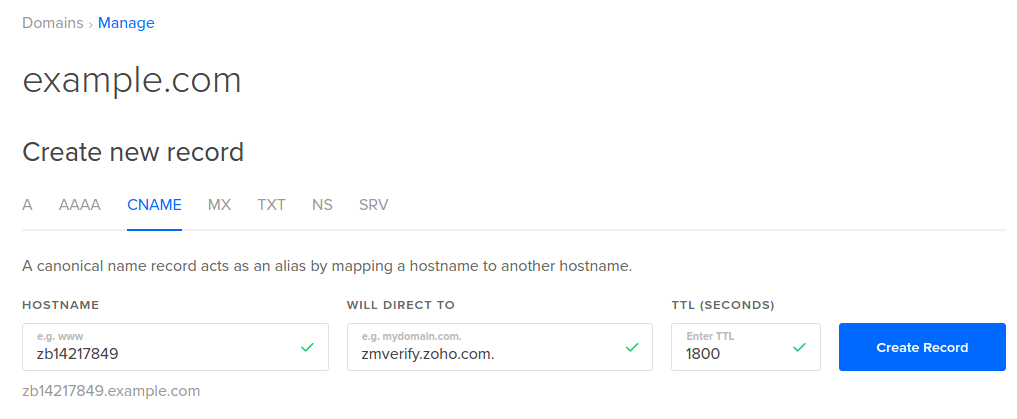
Next, paste the CNAME provided by Zoho (which looks something like zb14217849) into the Enter Name field. Paste the Destination provided by Zoho into the Enter Hostname field, and add a dot to the end of it (i.e. zmverify.zoho.com.). Now click the blue Create Record button.
Now go back to the Zoho Domain Setup page, and click the Verify button at the bottom.
Click the Proceed button at the prompt:
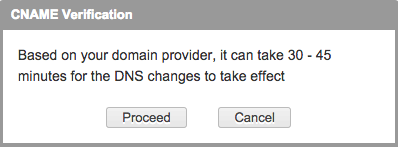
If you entered the CNAME record properly, you should see the following message:

After you have verified ownership of your domain, you may delete the CNAME record that you created via the DigitalOcean DNS manager. Click the red X to the right of the record and click the OK button in the confirmation prompt.
Enter your desired username for your administrator email account, then click the Create Account button.
Add Users and Groups
At the Add Users page, we will click Next to proceed to the next step in the setup. This is assuming you only need one user or you will set up additional mail users later. If you wish to add users now, click the Proceed to Add Users link instead.
We will proceed with the Groups page in a similar manner, by clicking Next. If you wish to add groups now, click the Proceed to Create Groups link instead.
Add MX Records
Now you must add the Zoho MX records to your Domain’s DNS record.
Go back to the DigitalOcean DNS management page, and ensure you have your desired domain selected.
In the Create new record section, select the MX record type. Next, enter mx.zoho.com. (with a dot at the end) into the MAIL PROVIDER MAIL SERVER field, and 10 into the Priority field, then click the Create Record button.
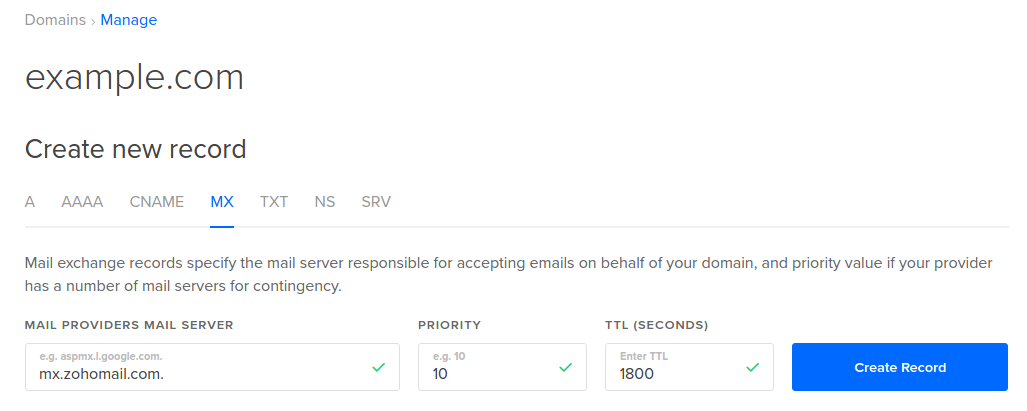
To add the second MX record, follow the previous step but enter mx2.zoho.com. into the Enter Hostname field, and 20 into the Enter Priority field.
Then add the third MX record, mx3.zoho.com.with a priority of `50.
Your Zoho mail with a custom domain setup is now complete! Feel free to proceed with the rest of steps that Zoho provides to perform email migration or set up mobile access.
ADDING SPF/DKIM
Sender Policy Framework, commonly known as SPF, is a text record associated with the domain to identify the servers permitted to send emails using the particular domain name. The SPF record to be added for a domain hosted with Zoho is provided below. You may need to include additional IP addresses after zoho.com.
| Blank or @ or yourdomain.com |
v=spf1 include:zoho.com ~all |
Refer here for more details about SPF records.
Use Zoho Mail to Send Email from Application
If you want to use your new mail setup to send mail from one of your applications, using SMTP (Simple Mail Transfer Protocol), it is very easy to set up.
Typically, you will want to create a new mail user for this purpose, so we’ll do that now.
Create Mail User for Application
In a web browser, logged in as your admin mail user, go to the Zoho Mail Control Panel.
Click User Details in the navigation menu (left side), then click Add User (right side).
Create a user with your desired first name, last name, email address, and password:
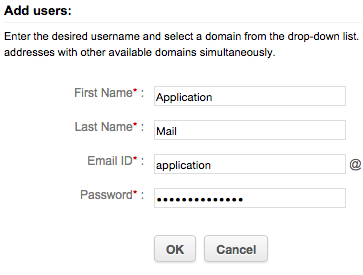
For our example, we will use the following details:
- First Name: Application
- Last Name: Mail
- Mail ID: application
With a Mail ID of “application”, and “example.com” as our domain name, the email address will be “[email protected]”. Take note of these user details (including the password), as you will need them when you configure the mail settings in your application.
Configure Your Application’s Mail Settings
The actual configuration of your application’s mail settings will vary, depending on the software, but the details that you will need to set up working outgoing mail are generally the same.
With this Zoho setup, you will need to specify the following details when configuring your application to send email. Obviously, some of your details will differ from the example, so substitute them as appropriate:
- SMTP Host: smtp.zoho.com
- SMTP Port: 465
- Use SSL Encryption: Yes, use SSL encryption
- SMTP Authentication: Yes, use SMTP authentication
- Email Address or Username: The email address that you set up in the previous step. In our example, the email address is “[email protected]”
- Email Name: The name associated with the email address. In our example, the name of the email is “Application Mail”
- Email Password: The password that you set when you created the application mail account
Once you configure your application with these settings, your application should be able to send mail through the new user under your custom domain.
Conclusion
You now should be able to send and receive email with your custom domain—test it out by sending and receiving mail in the Zoho mail app, as the admin mail user that you created. Now is a good time to add additional mail users and groups, if you need them. You may access your mail accounts through Zoho Mail, and you may perform mail administration through the Zoho Control Panel.
Good luck!